There are several ways you can create a knowledge base in WordPress. If you are searching for a way to implement one for your WordPress website, then welcome, we will show you one simple way to launch a knowledge base in two steps. Before we start , let’s see:
Purposes of Creating A Knowledge Base in WordPress
From its name, a knowledge base is a repository of information – knowledge that is organized for easy retrieval.
That serves several purposes;
First, it makes it easy for your customers to find information about your organization or products on their own without reaching out to support.
In so doing, you able to organize pertinent information about your business or products that turn out to be relevant to your customer care team.
It helps improves on the support provided, since you are answering questions, writing guides, sharing knowledge in the Knowledge base, your customer care team can quickly point customers to the relevant articles that answer their questions.
Thirdly, having organized information easily establishes you as an authority in your field. That is so true, especially where most businesses do not think much of content marketing, yet the reality is more people are using the internet to discover ways of solving their problems daily.
Fourthly, having an organized informational portal attracts Search Engine bots, this goes miles in helping push your rankings in the SERPs.
So, why not create one today?
How to Create a Knowledge Base in Your WordPress site in Two Steps?
It is easy and straightforward with Echo Knowledge Base for Documents and FAQs.

With this plugin you can easily create;
- Frequently Asked Questions (FAQs),
- Internal knowledge base for your employees and teams,
- External knowledge base for your customers,
- Documentation about your products and services, and
- Software manuals
You can view the demos you can create with this plugin here.
So let us get started.
Step 1: Install and activate the plugin.
If you follow our articles or read any other WordPress tutorial, it probably now sounds cliché, install and activate the plugin.
Well, that’s just it.
You can download the files from wordpress.org or install it within the Add Plugin area of your website’s admin dashboard.
Step 2: Create a knowledge base.
Now that the plugin is installed and activated, we can go ahead to create a knowledge base for our website.
From here we shall do two things;
- Configure the knowledge base; we will select a Layout, set the Style, Colors, and the slug.
On the Menu go to Knowledge Base then Configuration.
NOTE: This is optional, you can use the plugins default settings, then later you can come back and modify the settings to your desire.
When you are in the Overview area, provide your knowledge base with a name – click Update to capture it.
The default page created is – yourdomain/knowledge-base – click the edit link to edit it and view to open it in a new tab.
If you do not want to use the default page, you can copy the shortcode from here and paste it into any page on your website.

Next, configure the main page.
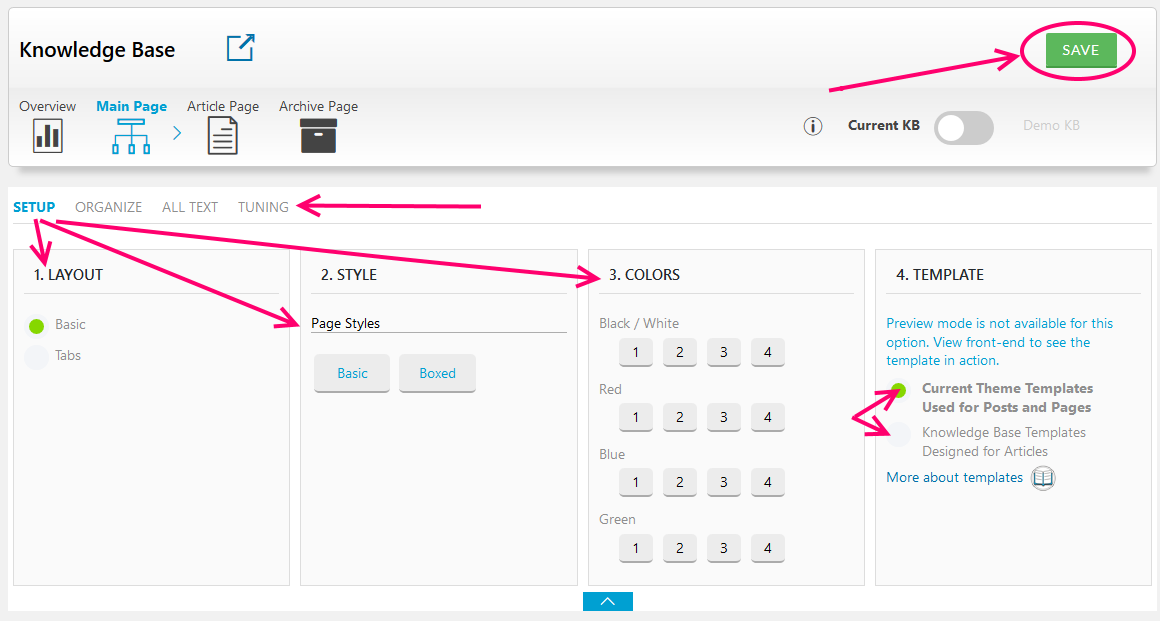
Click, the Main Page tab.

From here, you will configure the main page of your knowledge base,
- There is Setup, where you get to pick a layout, the style for your knowledge base, colors, and the template.
- Organize – organize categories and articles alphabetically or chronologically based on dates created, or just drag and drop them to where you want them to be.
- Under all text – you can change the wording for the default text of, Search Box, Categories, Articles – click them and rename them to whatever you want.
- Finally, tuning – from here, you can play around to find what visually appeals to you or your audience.

Since you are now familiar with the interface, you can go ahead and customize the Single Article Page and the Archive Page.
Do not forget to save your configurations. The save button is on the top right corner of the page.
- Add articles to the knowledge base.
All right. Now that we have the knowledge base looking how we want, we can start adding content to it.
Back to the Menu, Under Knowledge Base, click, Add New Article.

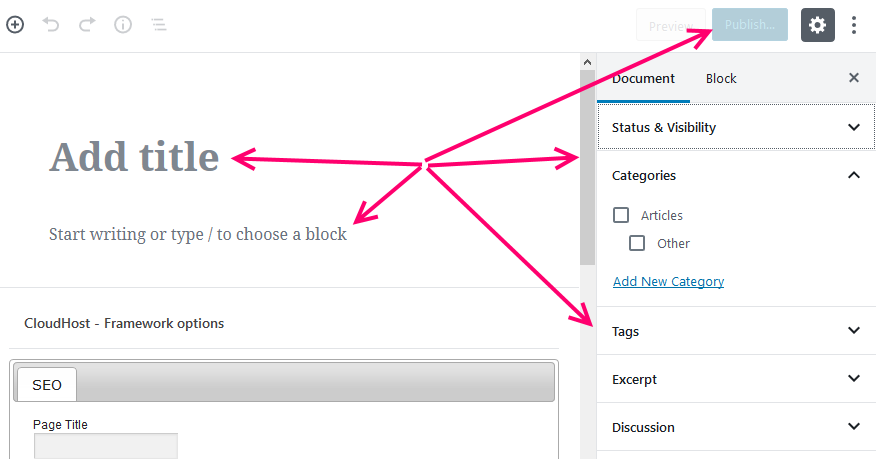
From here, it now pretty comfortable with the all familiar Gutenberg editor – for those using it. Echo Knowledge Base for Documents and FAQs plays well with the classic editor too.
Add a title to your article, then create content for it in the blocks, on the right, add it to a category – the Articles category is created by default, you can add New categories from within this page or in the Categories page under Knowledge Base.
Then add Tags to your article, excerpts, and discussion to enable or disable comments within the articles.
Publish your article when you are done.

You can now go to your Knowledgebase to see how it looks like.
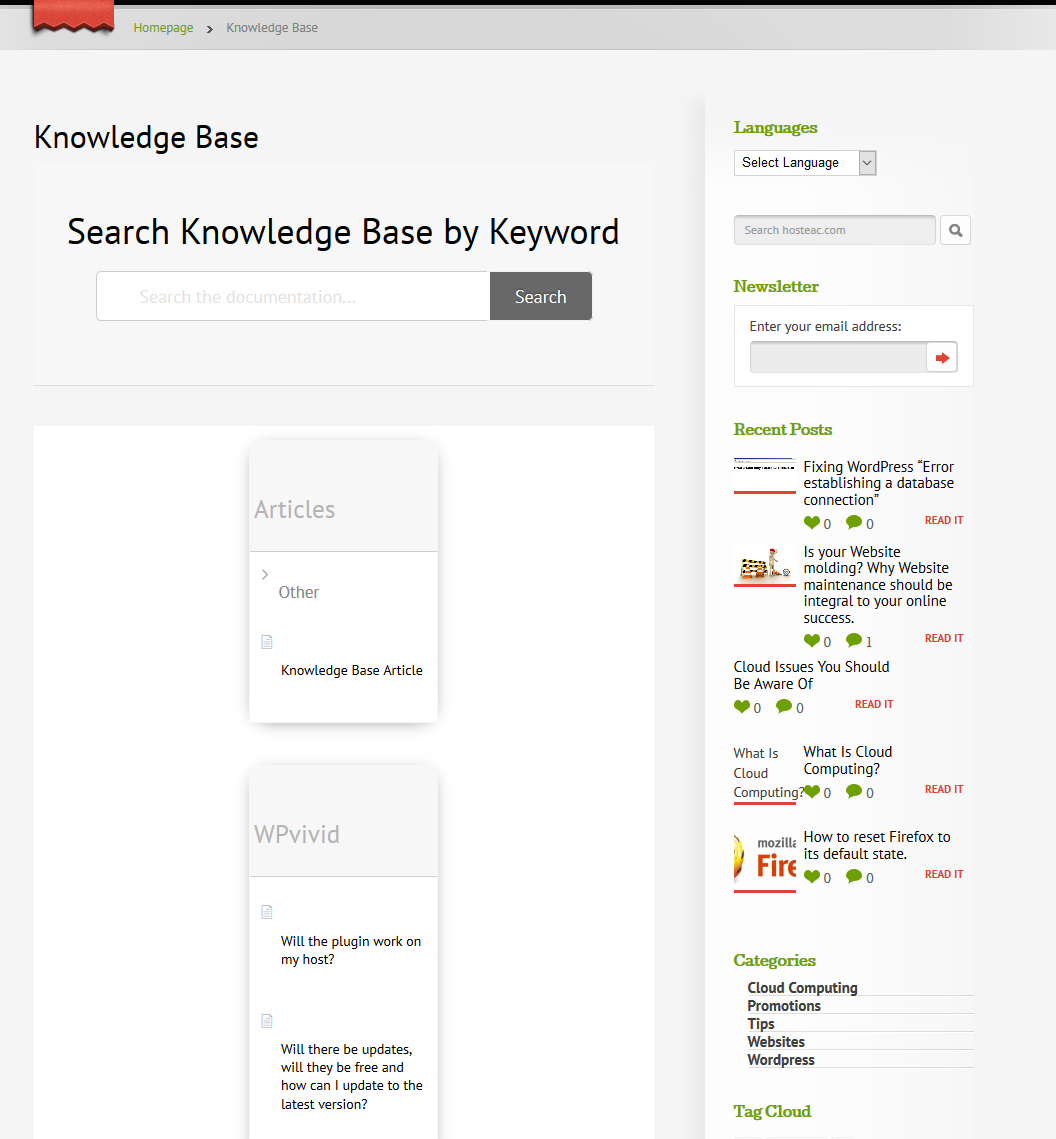
If you are using the default page provided, then it should be something like;
https://yourdomainname.tld/knowledge-base/

If all is good, perfect, if not and it needs some more work like mine, you can go back to the configurations and do the needful.
Taking a look at my page, having a sidebar on the pain knowledge base page may not be a great idea. If it bothers you, your page settings or theme settings should have options for a full-width page.
Final Thoughts
We have gone through a bit of information in this article on how to create a knowledge base on a WordPress website.
I think the easiest way to achieve that is using a WordPress plugin.
The one we picked for this article, Echo Knowledge Base for Documents and FAQs is awesome. It looks good, it can work with your theme, so there is a consistency across the website, yet it also provides its themes.
It is feature rich, and with it, you can create a simple or a complex information portal for your WordPress website.
We started with configuring the plugin, but you do not have to do that, you can right away start adding content to your knowedge base.
The benefits of a knowledge base on a website cannot be underscored, so why not give it a shot.
If this plugin works for you, share with us why you think so, if there is any other you are using, we would also love to know more about it. Use the comment section below to share your feedback.
You may also want to create a business directory on your site.