Planning to move from Wix to WordPress? Great, that’s one of the best choices you will make for your online growth.
It’s a privilege for us at WPvivid to welcome you to the WordPress family; better, we shall take you through an easy to follow process for a seamless migration.
As you prepare, here is what we shall cover.
- Procure a domain name and website hosting
- Install and setup your WordPress website.
- Move your Wix site to WordPress
- Setup redirects
Step by Step: How to Move Your Blog From Wix to WordPress
Step 1: Procure A Domain & Web Hosting
A move from Wix to WordPress shifts you from the comfort of an all-inclusive service where you don’t pay for anything at the start.
With the Self-hosted WordPress, unless you purchased a branded domain name, you will need a domain name and a hosting account where your files are saved and served to the world.
Website hosting is cheap, from as low as $2 a month you can get yourself world class hosting for not only your website but for even emails with your branded domain name.
If you purchased hosting from some of the website hosting companies, you are given a free domain name for the first year.
Step 2: Install and Setup Your WordPress Website
Most WordPress optimized hosts come with WordPress preinstalled, so you will not need to install WordPress.
Just, in case you need to, you can manually install WordPress, it’s actually not complicated.
Step 3: Download Wix RSS Feed
Moving a website from Wix to WordPress is a lot more manual compared to the other website building platforms like Tumblr, Blogger, or WordPress.com that have tools that automate most if not all of the migration tasks.
For the blog posts, we will use the Wix RSS Feed (blog-feed.xml) to import all the blog posts to our WordPress site automatically.
To download your RSS feed, add /blog-feed.xml at the end of your Wix website URL address.
It should look like this.
https://username.wixsite.com/sitename/blog-feed.xml
Of course, replace username with your username and sitename with your website name on Wix.
If you did it right, you should see a page like the one below.
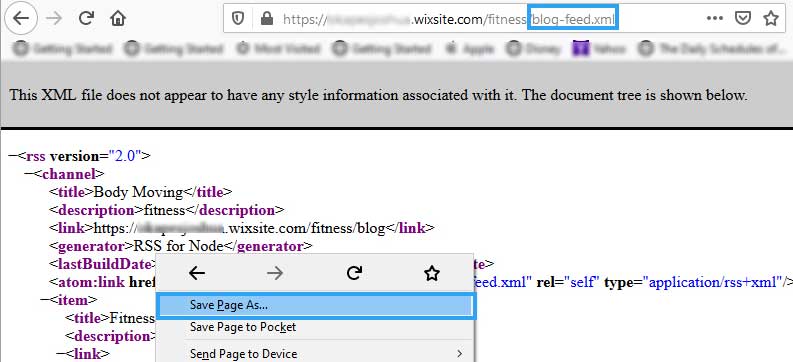
Right-click anywhere on the page, and then click Save Page As…
Download or save the file anywhere on your computer.
Step 4. Import Wix Blog Posts RSS to WordPress
Import Wix Posts to WordPress
Once you have saved the file, login to your WordPress admin section.
On the left menu, you will see Tools. Now click Import on the submenu that appears when you hover over Tools.
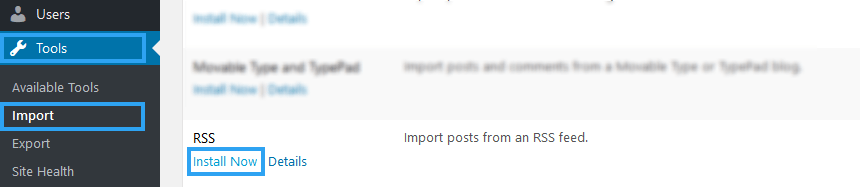
On the page that opens, under RSS, click Install Now.
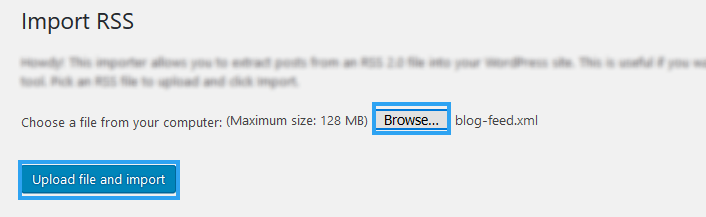
This importer allows you to extract posts from an RSS 2.0 file into your WordPress site.
Once it is installed, click Run Importer

Next, click the Browse button and select the file you downloaded earlier.
Once you’ve selected it, click Upload file and import.
The importing time will vary depending on how big your file is. You will be notified when the import is complete.

Go to your posts and see that the posts are there. This is under Posts, All Posts on the left menu.
When you view your posts, you may not notice, but images are still hosted on the Wix servers.
What you need to do is download and import all the images attached to the posts.
If you have hundreds of posts, don’t worry, a free WordPress plugin – Auto Upload Images – will automatically download all external images to your posts when you republish your posts.
Once you have installed and activated Auto Upload Images; you need to update each post.
If you have 500 posts imagine how long that will take you.
What you can do is update all the posts in one go.
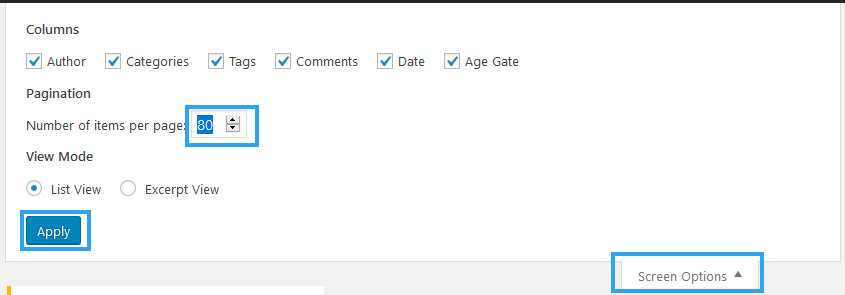
For that, still in the All Posts page on top of the page you will see Screen Options, click it to toggle the available options below, increase the number of items to show on the page – if you have 500 posts, then enter 500 here.
When done click Apply
Under the Title column, click the check box to select all the blog posts, above it, select Edit from the drop-down options and then click Apply.

Now, click update on the next screen.

You have successfully imported your blog posts.
Next, you need to import your pages.
Import Wix Pages to WordPress
Unlike the blog posts, you will have to import your pages manually. Well, it’s not really importing, you will more-or-less have to recreate your pages.
There is one thing to keep in mind here, WordPress themes, use different page builders, you would need to acquaint yourself with the page builder to create new pages.
However, using the default Gutenberg editor, you can simply create a new page with the same name as the page you had on Wix.
Browse to the Wix page you want and copy all the text and images.
This is is going to be a manual process, and there is no way around it.
To create a page, go to the Pages menu item and then click Add New.

Give your page a title – this should be the same title or slug you are using in your Wix site – better if you just copy and paste the title into the Add title field.
For the content, copy it from your Wix site and paste it in the field that says, Start writing/ to choose a block.

When you are done, don’t forget to publish or update your page.
The above method of adding a page assumes you are using the default Gutenberg editor that your WordPress theme comes with.
If you are using a premium theme, or any other modern WordPress theme, chance is that your theme comes with its page builder. You will need to explore its knowledge base to be able to create pages.
Step 5: Setup Redirects
After moving from Wix to WordPress, it is important to redirect all the traffic to the old Wix site to your new WordPress website.
One caveat, though, is that only users on premium Wix plans that come with branded or personal domain names can redirect their traffic to the WordPress website.
There’s a Stack Overflow thread for a 301 Redirect from Wix to WordPress that you can look through.
Final Thoughts
Finally, if you find our labor of love helpful, then follow us on Twitter for more articles and updates.
And, it goes without mention, always keep a backup for your website before you install or do anything on your website that has a high chance of distorting the normal operations.
WPVivid Backup plugin is our in-house tool with which you can deploy to ensure that your website is disaster-proof. No, other data back up plugin out there can compete with the features you get with our free version. Try it today.
Now you may also want to learn our ultimate guide on how to SEO a new WordPress site.