If you have decided to move from WordPress.com to WordPress.org here is a very simple to follow guide on what you need to know to make the transition successfully.
You hear a lot around blogging or publishing circles about WordPress.com and WordPress.org, and sometimes you get confused what is what and what is right for you.
Like Blogger (we have an article for those wish to move a website from Blogger to WordPress), WordPress.com provides users the space to create and publish content. Most of the people on it seduced by the free structure to building a website online, which makes it easy for anyone to get their ideas online.
But like any free or proprietory platform, free seldom comes with the power, features, and freedom that serious a blogger or small business needs to succeed online.
It is those restrictions that force many to alternatives; WordPress.org provides such freedom and power to create.
To those making the shift, thankfully, wordpress.org is an opensource version of wordpress.com, so your working experience in terms of use, creating and managing content will not be any different.
As you can guess, both wordpress.com and wordpress.org are developed and actively maintained by the same people. As you have seen, the only difference is where the website is hosted, and what you can do with the website on either platform.
Once, you are ready to move, let’s see:
Step by Step: How to Move from WordPress.com to WordPress.org
Step 1. Buy A Web Hosting Plan and A Domain
While the wordpress.com account may have been free unless if you purchased the premium services, the self-hosted wordpresss.org website is run entirely on different systems.
With wordpress.com you did not have a vote on where the website is hosted, with wordpress.org, you decide.
And that is the first thing you need.
If you didn’t have a custom domain name, then alongside the hosting account you will also need a domain name. Fortunately, due to the cutthroat competition, several website hosting companies will give you a free domain name for the first year when you purchase their hosting services. Or here is our guide on what to consider before choosing a WordPress hosting.
If you are using a custom domain name on your wordpress.com website, then you will only need to update your nameserver details to reflect the new ones from your host.
Once you have purchased your hosting, you will need to install WordPress to your hosting account.
If you purchased a WordPress hosting account, then most likely, WordPress comes preinstalled, all you need is to log in to your backend.
Step 2. Export WordPress.com Website Files
Go to your site after you log in to your WordPress.com account.
In the left menu under Tools, click Export.
Next, under Export your content, click Export All.
Once your files are ready for download, click Download.
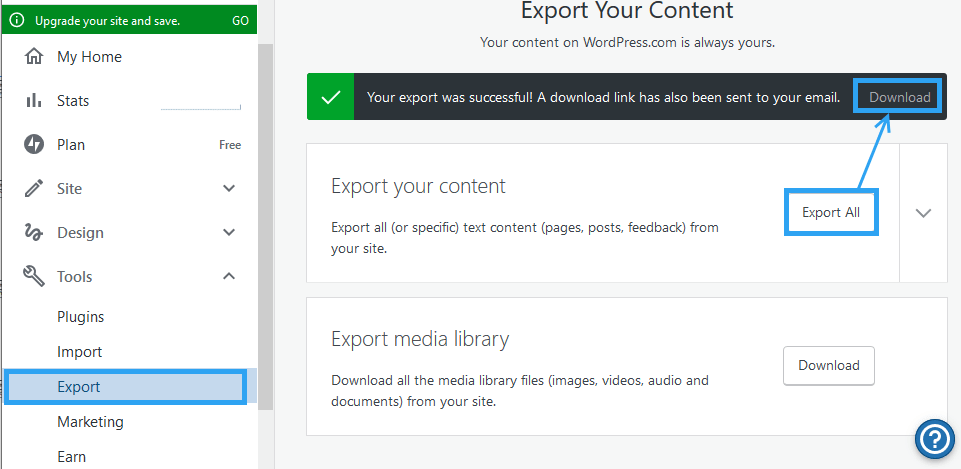
In the pop-up dialogue box, select Save File and click OK.

Step 3. Import WordPress.com Website Files to A Self-Hosted WordPress
Now login to your self-hosted WordPress website.
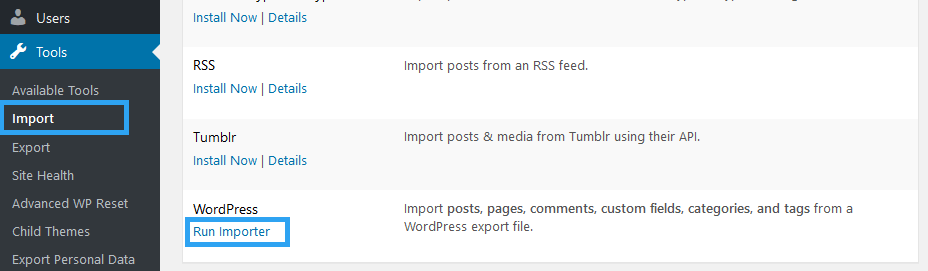
On the left menu, go to Tools, then to Import.
Under WordPress, click Run Importer.
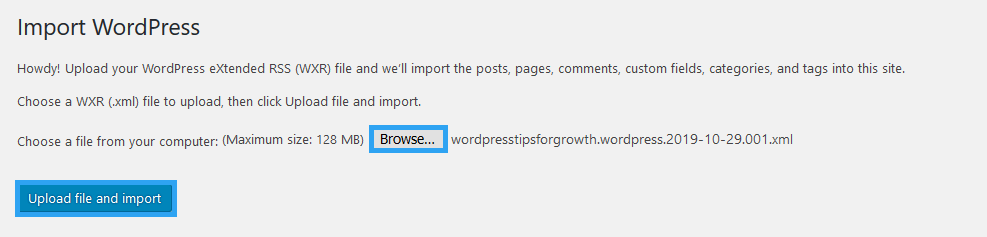
Click Browse and select the file you downloaded from your wordpress.com website, and then click the Upload file and import button.
Note: the file needs to be .xml. If the file you downloaded is compressed, decompress it to find the .xml file.
Step 4. Assign Authors and Import Attachments
WordPress makes it easy for you to edit and save the imported content by assigning the content of an imported author to an existing author on your website.
If say, you had an existing author like – jerry – you can assign all the posts to that current author.
If you, however, prefer to keep things as they were, as in you want to use same author name in your self-hosted website, then you will need to supply the user name, the subscriber role is associated with the new user, and a randomly generated password will be created for the user.
Choose whichever you prefer, and then tick the checkbox under import attachments to download and import file attachments of your posts or pages. If your posts and pages had images, then ensure that this is checked.
When you are done, click Submit.
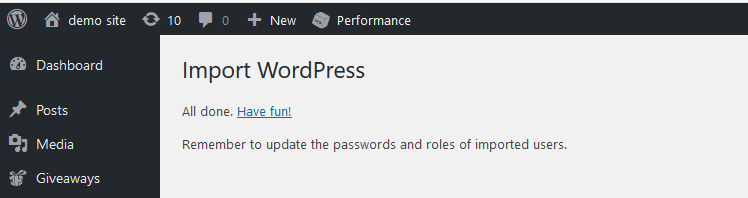
You are then greeted with the All done notice.
Step 5. Redirect Traffic from WordPress.com to WordPress Website
A move should never be complete without taking care of traffic redirects.
If you were using a custom domain name, then you may not need to do much since your users already access your website using your domain name, and search engines already know and list your site in their results with your domain name.
Pointing your domain name to the new web host’s nameservers is all you need to do.
What you need, however, is to use the same permalink structure on the new website.
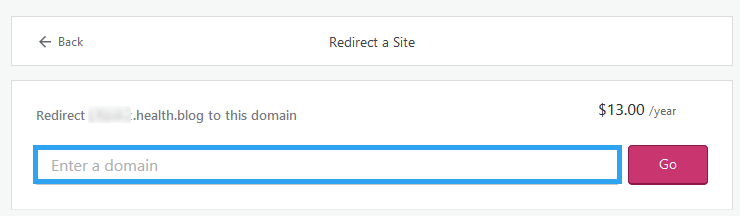
If you, on the other hand, were using the free subdomain names on wordpress.com or a different domain name, then you can easily redirect all the traffic on your old site to the new website with a $13 annual fee.
In your old wordpress.com dashboard, go to Store then to My domains and then Redirect
If you login to the wordpress.com account on the other hand, in the site you want to redirect scroll down under Manage click Settings.
Under the Site Address click redirect this site.

Enter the domain name of your new self-hosted WordPress website and click Go.
On the next screen, you are asked to supply your details to make payments.
For the best results, you will need this service for a year or two; within that time, your visitors should notice and be conversant with your new website.
Conclusion
Purchase a hosting account that should come with a domain name, install and setup your self-hosted WordPress website, back up or export data from your wordpress.com website, import your data to the self-hosted WordPress website, and finally, users will not know about your move, so you need to redirect traffic to the old site to your new website.
That’s it! Hopefully this guide has helped you successfully move from WordPress.com to WordPress.org. For next, you may also want to learn how to run your new WordPress blog and make money with it.