Today, you can start or grow your email marketing efforts, by adding a newsletter/subscription widget or popup plugin to your WordPress website, at zero dollar cost to you, may, just a few minutes or hours of your time.
Email marketing no doubt has been and still is the most important and cost-effective tool for both customer acquisition and retention for any business.
By using WordPress as the content management system for your website, you have access to over 50,000 free plugins that can be used to extend the functionality of your website in unimaginable ways.
Another hard truth is that over 70% of your website visitors will never return to your website. By tapping into the wealth of WordPress ecosystem you can install a newsletter/subscription popup plugin like MailOptin, which enables you to collect emails from your website visitors on autopilot.
So, let us configure a newsletter/subscribe widget for email marketing in WordPress website, using MailOPtin.
What is MailOptin and why do we need it?
As the name suggests, MailOptin is a lead generation and newsletter plugin that runs entirely on your WordPress website.
It is shipped in two plans, the Lite or free plan and the premium plan.
The plugin enables you to collect email addresses from your website visitor by use of a form or a call to action button, that can be placed in a widget or popup triggered globally or in targeted pages. The premium version allows you to a lot more targeting.
MailOptin is such a powerful newsletter/subscription popup plugin that works without much fuss.
It is easy to install, easy to configure, and easy to style to fit your website theme, even for the lite version, I wouldn’t say that about many plugins.
The one most important reason why we love this plugin is the ability to configure it to work with most of the popular email marketing service providers out there, like MailChimp, AWeber, Constant Contact, Campaign Monitor, ActiveCampaign, and a lot more.
I really believe this is the secret power of MailOPtin newsletter/subscription popup plugin.
For this article, we shall integrate MailOptin with Mailchimp, go ahead and create an account if you don’t have one, the free plan allows you to build a list of up to 2000 subscribers and can send up to 12,000 emails in a month.
Configuring and using MailOptin – Popups
We assume that you have installed the plugins mentioned above on your WordPress site.Now that we have our newsletter/subscription popup plugin installed, let’s go ahead and configure and get it working.
1.We head back to the Left Main Menu, you should see, MailOptin. Click Settings. If you will be using the Premium version of the plugin to manage your newsletter then you will need to fill the Email Automation Settings. In our case, we shall be using MailChimp which will manage our newsletter.
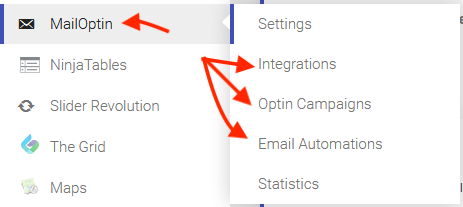
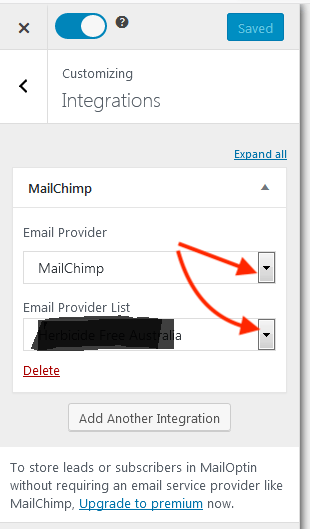
2.Next, from the Menu, Click Integrations and look for MailChimp or any preferred provider from the list.
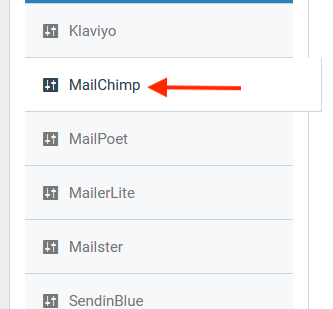
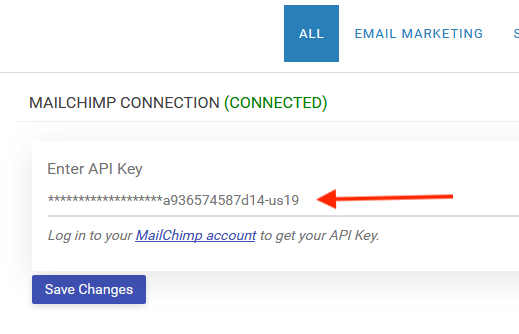
3.On this screen, you will need to enter your Mailchimp API. If you already have one, paste it there, if not, click on the link to create one for yourself.
4.Mailchimp or whichever email marketing software is now ready to collect our emails. Now, it’s time to create a form that we shall use to capture our leads. MailOptin provides 5 opt-in types, the lite version allows you to create 3 types.
- In-post – used in your posts or pages.
- Lightbox, a popup triggered by some events on the site
- Sidebar/widget. Which we can add to any section of our website. We shall add one to our footer section in this tutorial.
5.Let’s dive in; we shall set up the Popup and sidebar/widget optin types;
From the Mailoptin menu, Click Optin Campaigns> then click add campaigns

Next, enter the Campaign title, Choose the optin type and then select a theme. You have 2 themes with the free version.
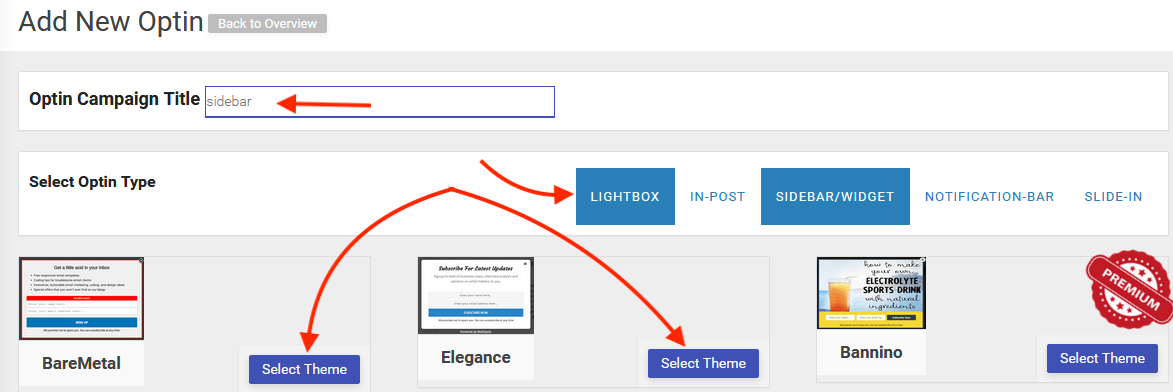
On selecting the theme, you will be taken to a page where you can customize your forms. You are at liberty to unleash the creativity in you here. You can remove fields, change colors, text and a lot more.To get our form to actually work, you will be certain that you associate the form with a mailing list from the integrations section.Click Integrations; choose your Email Provider, then, Choose the List you want to be associated with this form. After you have styled your form to your liking, associated it with a list, remember to save and activate the form.
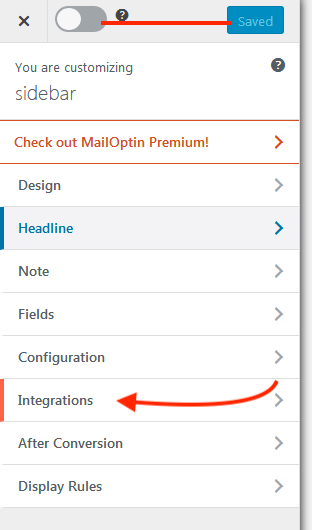
To get our form to actually work, you will be certain that you associate the form with a mailing list from the integrations section.
Click Integrations; choose your Email Provider, then, Choose the List you want to be associated with this form.
After you have styled your form to your liking, associated it with a list, remember to save and activate the form
![]()
Now that we know how to do that, let us look at how to actually do it with the two opt-in types.
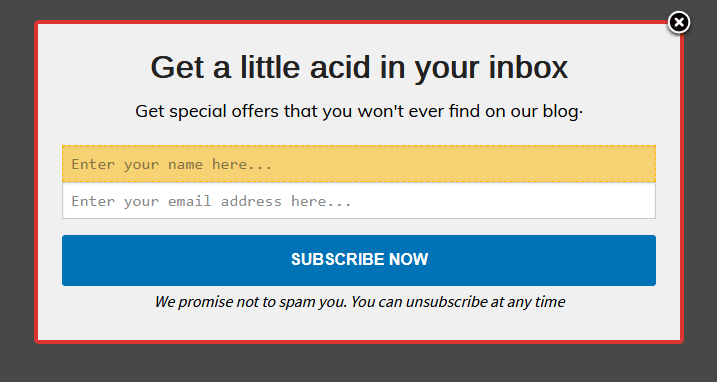
Configuring the Lightbox – Popup
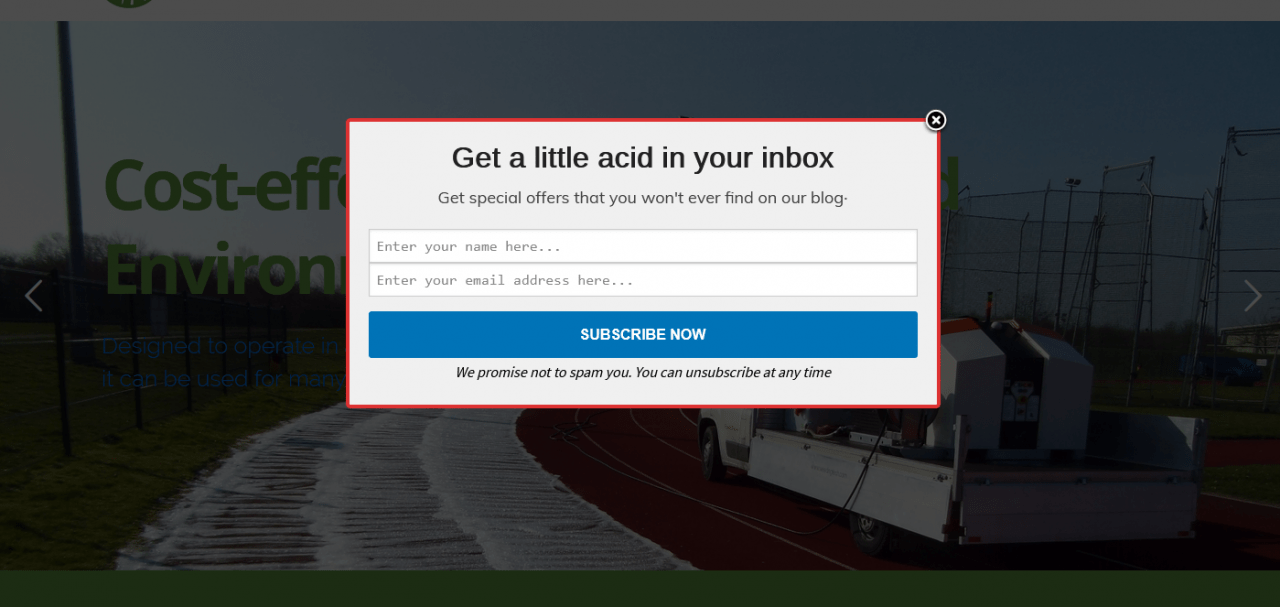
Choose the Lightbox Optin type, choose the theme, then, customize, see the steps above.
For this optin type, you will need to set the display rules.
In the default settings, the form will pop up on any page of the website that our visitor lands on. You can choose what pages can trigger the form.
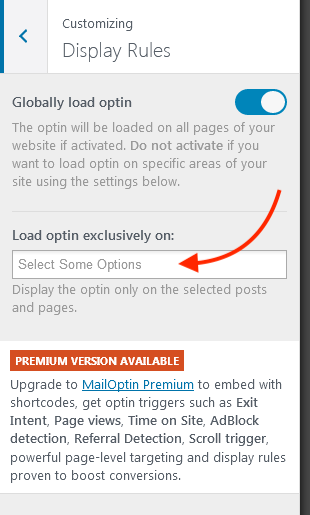
This ideally means that you can have as many popup forms as you wish for different pages and for different mailing lists.
The premium plan has a lot more ways to trigger the form. If the free options don’t work for you, since we are using Mailchimp you could opt to use Mailchimp’s popup form that lets you configure the popup up form with more advanced settings.
Save and activate the form. You are now ready to receive collect email address. This is how the form looks like on our website.
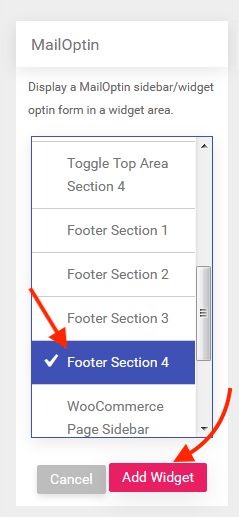
Sidebar/widget. We shall add one to our footer section in this tutorial
Following steps; the default theme we chose for the sidebar widget looks like this.

After some customization, with our brand colors, and text, we have something like this;

To add it to a widget, we simply go to Appearance, widgets, look for MailOptin widget, and choose where you want to add it – in our case, we are adding it to the footer section of the website – you can add it to any sidebar.
We should be able to see it on our live site,

Beautiful, isn’t it?
If you do not like the look, you can always head back to MailOptin > Choose Campaign > and Click edit to go to the customizer.
For now, let’s test our form.
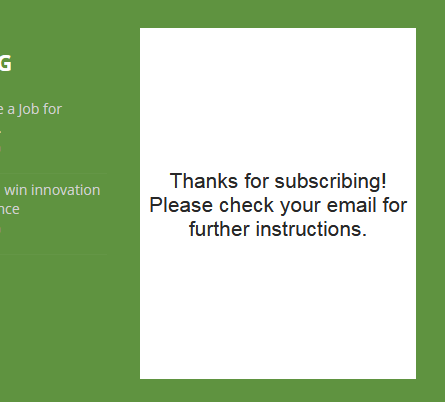
Enter a name and an email address. If we got it right, then you should see this.
From the customizer, you can change the default text for or you can choose to redirect a user to a different page.
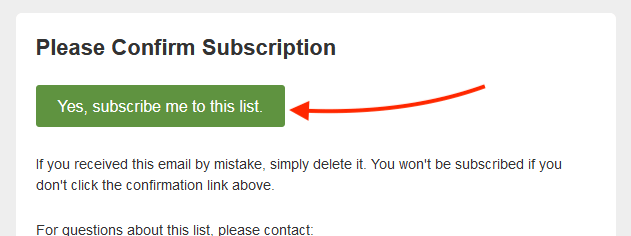
Your subscriber will receive an email in their inbox, where they have to click to finish the subscription. These will often depend on the settings you have with your email marketing software, in our case Mailchimp, our mailing list requires new subscribers to verify their email addresses before they are added to the mailing list.

And that’s it.
For those who are new to WordPress and plugins, you are now able to install and activate any plugin. You have learned how to install a newsletter/subscription popup and widget plugin to your WordPress website, and are on your way to collect leads and emails from your website visitors.
By itself with a premium plan, MailOptin can automate your newsletter functions, but, by using another third party mailing software dedicated to managing emails you are able to get the best out of the free version.
If you have some bit of CSS knowledge you can style the forms and text further to fit your theme. The default look is great enough to get you started without touching any code, making it simple for any WordPress website owner to add and a newsletter/subscription popup plugin to their website.
Besides MailOptin, there are many other great plugins out there that you can explore. Here are a couple others that will enable you to configure a newsletter/subscription popup or widget on your WordPress website.
Other great Newsletter/Subscribe plugins
1.Mailchimp
Yes, we are using Mailchimp with MailOptin above. But, I honestly feel that the value of Mailchimp to a website cannot be understated.
As matter of fact, Mailchimp can do everything that we are using MailOptin for, but, we choose to take a route with less code.
Configuring the popup form from Mailchimp is pretty easy, so is the widget – the only problem with the widget is you will need to do a bit more styling to get it to look right.
Mailchimp deserves an article of its own, the benefits to your website are immense and the best part is the free plan is so powerful that a small blogger or small business can make the most out of it, by the time you hit the 2000 subscribers that come with the free plan, surely, you should be able to monetize your list to afford the $10 monthly subscription.
If you are running an e-commerce store, I would definitely recommend you consider the automation features of Mailchimp.

2.Popup Builder
Popup Builder is another cool newsletter/subscription popup plugin to consider. Popup Builder with its themes lets you create and manage powerful popups for your WordPress website with ease, and with the ability to customize the look and feel of the popup, animated entries, and do a lot more.

3.OptinMonster – Premium Plugin
OptinMonster is one of the best and popular newsletter-subscription popup plugins for WordPress websites, with over 800,000 active installations.
Within minutes you can build high-converting opt-in forms using the pre-built templates, and from five different campaign types, you can choose powerful ways to display your subscription forms.
If you have the budget for email marketing, then this plugin is worth considering for your WordPress website. With plans starting from $9 a month; you can empower your website with tools and features that will no doubt increase subscriptions and insights for your email marketing.
Need more power, like MailOPtin, Optinmonster can be easily integrated into other email marketing software.
On one part we installed and configured the newsletter/subscription popup, the other part, which we did not dwell much on, is how to set up and configure our email marketing software – in this case, Mailchimp. This article assumed you have a Mailchimp account, need a bearing here, then this article will help.
Conclusion
The importance of building your mailing list cannot be understated. 70% of your website visitors will never return to your website after they leave. That’s a chilling truth.
Plugins available to your WordPress website, free and premium give you the power to change such statistics.
By being able to capture their email addresses you have a chance to drawback and probably cash on your website traffic through targeted email marketing campaigns.
With a newsletter/subscription popup like MailOptin, you can start today, now, to start and grow email marketing for your business.
Want to know more about how you can make the most out of your WordPress website, then signup to our mailing list or follow us across our different social media channels.
For next, you may also want to learn how to create a membership site to build online community for your brand.