If you have a brick and mortar shop or shops, if you have a website for your business, then here is how to add a store locator in WordPress and drive your online traffic to your physical stores.
The internet has driven hordes of people online. That is where the search for any product or solution starts. When clients find you online, does your website lead them to your physical stores if that is where orders are made, or do they meet a dead end?
Adding a store locator is one neat way for your website to serve the growth of your offline brick and mortar stores.
And it does not need to be expensive. Using a free WordPress plugin, you can have a store locator up and driving traffic to offline within minutes for free without getting lost in code or the complexities of Google maps.
In this article, we shall use WP Store Locator.
WP Store Locator is a powerful yet easily customizable location management system you can use to add a store locator to a WordPress website in under two minutes. The better part, it is free.
So, let’s get started.
Step by Step: How to Add A Store Locator in WordPress
Step 1: Install And Activate WP Store Locator Plugin
Log in to your WordPress back-end.
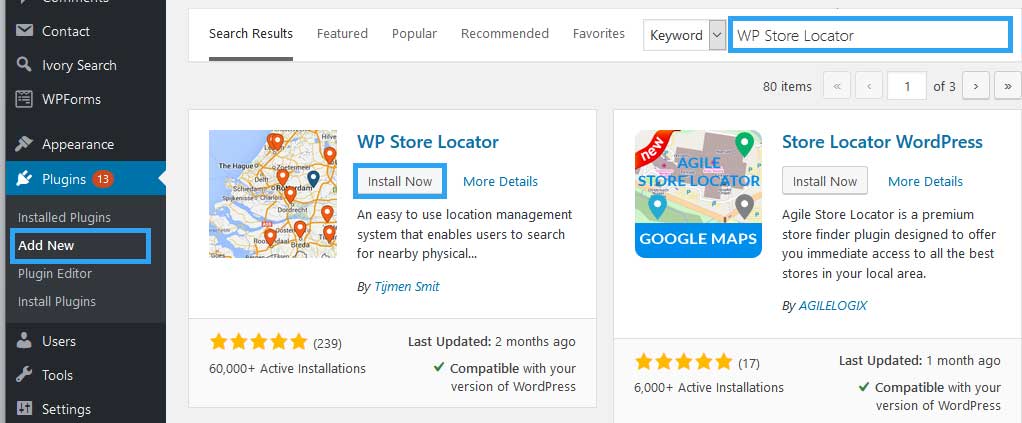
On the left menu, go to Plugins, Add New.
Search for WP Store Locator; in a moment, the results will load, under WP Store Locator, click Install Now, wait for a second or two and then click Activate.
Once installed, you will need to do two important things before you can add a store locator to your WordPress website.
The first is, providing the Google Maps API and Second, second, the Start point for your map.
You do all this in the plugin’s Settings page.
In your left menu, go to Store Locator and click Settings.
Step 2: Set The Google Maps API
This plugin – like any application that uses Google maps – requires a Google Maps API.
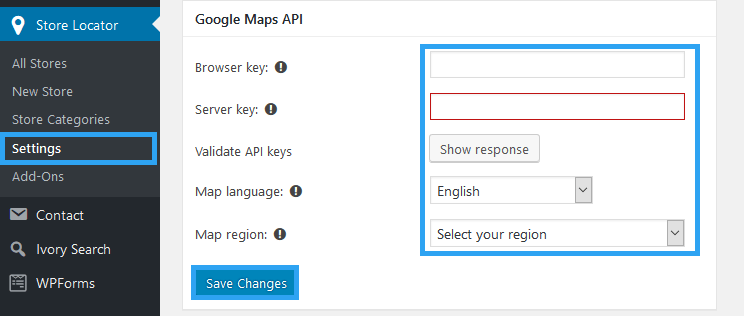
You need the Browser API Key and the Server API Key.
The plugin developer has an excellent step-by-step article on how to create a Google Maps API.
The APIs are free, but, Google requires you to attach your project to a Billing account. This necessitates a credit card. You will not be charged for anything, however.
Once you have the API keys, insert them in the respective places.
Select your Map language and Map region and click Save Changes.
Step 3: Set A Start Point for Your Map
In the Map section, still in the WP Store Locator settings, enter your location.
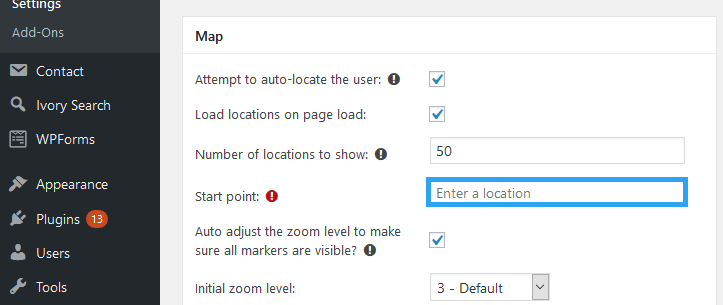
The start point is a required field, which is used as the initial starting point where the center of the provided city or country for the user if auto-locating the user is disabled or fails.
Those two areas are a must for you to use the plugin, but you are not restricted to them.
There’s a section to set your search settings, user experience settings, set a marker and define your store settings like opening times and map type for location preview.
Step 4: Add A Store Locator to Your Website
After providing your Google Maps API details and the start point, you can now add a store to your site.
On the left menu, go to Store Locator, under it click New Store.
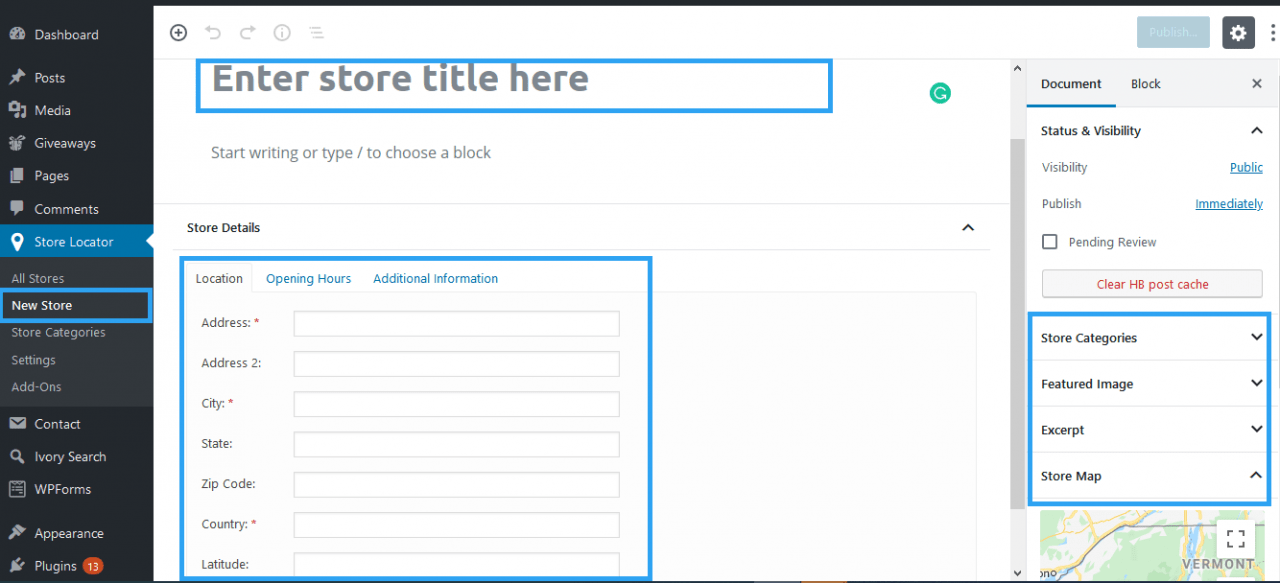
Enter the store title, then under the Store details, enter your location, opening hours and in the additional information tab, provide your website, email, telephone, and fax details.
On the right pane, attach your store to a category, then add an image to your store under the featured image.
Under the store map, you can drag the marker to adjust the exact location of the marker.
Publish your store and then go to the next step of;
Step 5: Adding The Locator to The Page
Create a new page or post or edit an existing page or post and then enter this shortcode – [wpsl]

You can also add the shortcode to a widget that can appear in the sidebar of your website.
Publish or update your post and then view the page to see your store locator on your website.
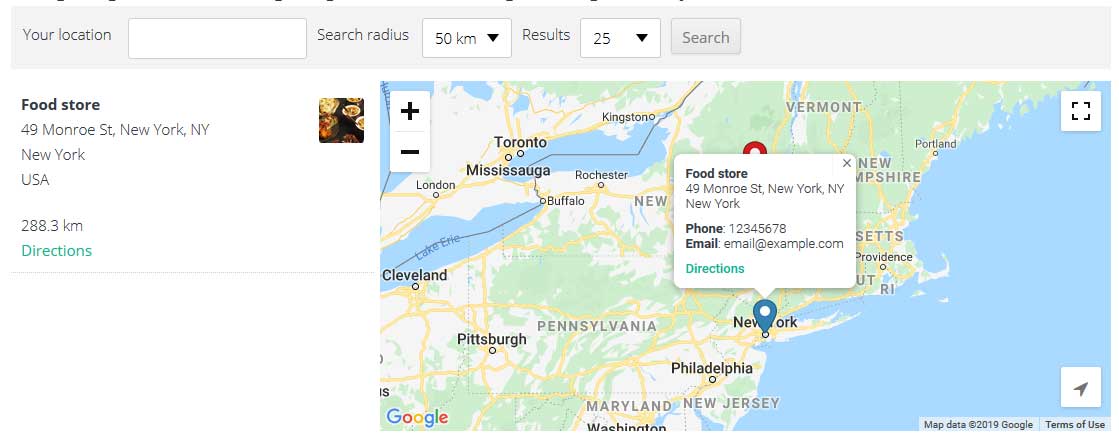
That’s what you need to do to add a store locator in WordPress.
Conclusion
In this article, I’ve shown you how to add one store to your website, if you run a business with multiple store locations, then create as many stores as you need.
They will all display on your website.
WP Store Locator is a great and easy to use location management plugin loaded with features not deserving in a free plugin.
If you, however, prefer to try something else before you commit, then here are our handpicked list of the best free store locator plugins to show a map of your store location in WordPress.