Learn how to easily install Facebook pixel to WordPress with this article.
Facebook is no doubt one of the giants when it comes to social, with it, you can promote your business to an almost infinite audience.
Why Do You Need to Install Facebook Pixel to WordPress?
Facebook, like every other social media site, frequently changes its algorithm. Your posts are exposed to fewer of your follower – making it hard to succeed on social without digging into your pockets with paid ads.
But, once you start running ads, you will soon realize how Facebook ads can get expensive, especially if your campaigns are not correctly optimized.
To optimized and build effective ads, you need to learn how to leverage the data your website generates as visitors interact with your website and with the ads.
Facebook Pixel, is that tool that brings the power of insights and meaning to your data, thereby helping you create effective ads.
In this article, we shall install Facebook Pixel to a WordPress website with a free plugin.
How to Install Facebook Pixel to WordPress?
We shall use Pixel Cat – Pixel Manager, formerly known as Facebook Conversion Pixel.
![]()
Install and activate Pixel Cat – Pixel Manager
In the Add Plugin section of your WordPress site, search for Pixel Cat – Pixel Manager
In the result, you should see it – click Install Now, and then Activate the plugin
![]()
Once it is activated, you will see a thank you notice on the same plugin page, click Set up my Pixel.
You can equally find this from the menu, Facebook Pixel > Facebook Pixel.
![]()
We shall start with the settings page and configure the plugin.
![]()
With the free version, you can only add the Excluded Users – logged in users from those account types will not trigger pixel.
In the Main tab Supply your Facebook Pixel ID.
Pro users can add multiple Facebook Pixel IDs by clicking Add New.
![]()
Not sure if you have a Facebook Pixel ID? Then go to the Facebook Pixels Events page – if you have one – you should see it under Facebook Pixel – copy the ID then return to your WordPress website, pasting it in the Facebook Pixel ID field.
![]()
If you do not have one. Then, you can easily create one.
- Go to your Facebook Ad Account.
- On the top left-hand select ‘Ads Manager,’ and go to Events Manager.
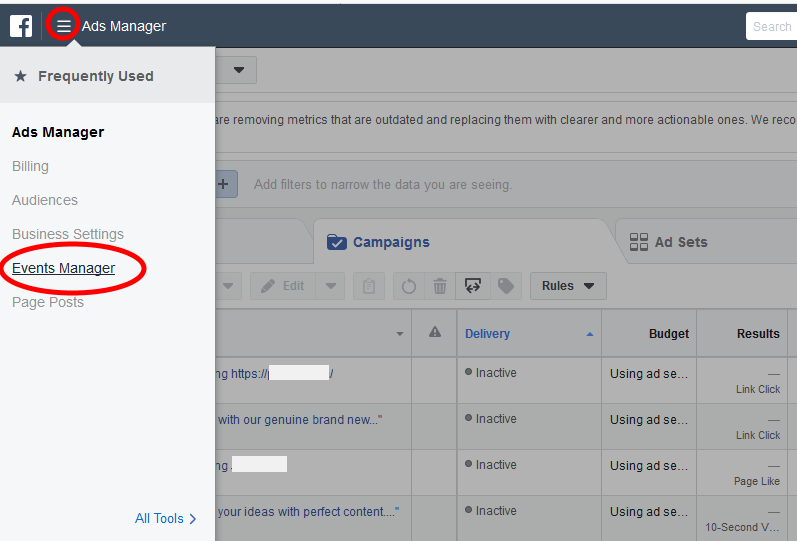
- When the page opens, on the Left click Add New Data Source and then Click Facebook Pixel

Follow the next prompts and once you set up a pixel account, you should see your Pixels ID, copy it and then return to your website and paste it there.
Note:
Facebook aggressively changes how these procedures, so depending on the time you are reading this; there could be a difference in the steps of creating the Pixel ID. One thing that is a constant is that you will always find it in your Facebook Ads Manager
Pixels can also be added straight from the ad itself.
That aside, let us add events.
Add Events
Still on the main tab just below where you entered your Facebook Pixel ID, Under Events click Add New.
![]()
In the pop window;
Select the trigger – with the free version you are limited to the page visit, and then select the pages or posts or categories where the event is triggered.
The select the Event – there are several options that you can select from.
The time delay and scroll are only available in the pro version to exclude bouncing visitors.
When you are done, click save.
![]()
Once you have done that, you will need to wait a couple of hours to check your Facebook pixels page for the data gathered.
Conclusion
Successful marketing campaigns are those that are founded based on concrete data – data about your systems, data about your users, data about how these users interact with your systems.
Facebook pixel helps you build targeted marketing campaigns based on such concrete data. It takes the guesswork out of creating laser focused ads; hence a better return on investment for your ad spend.
Pixel Cat – Pixel Manager makes it easy to install Facebook pixel to WordPress. However, its juiciest features are restricted to pro users.
If you want to get more out of it, then you have no option to purchasing the pro version of the plugin, if not, you could consider another plugin.
The alternative plugin I recommend, I personally use it on some of our websites is the official Facebook Pixel Extension – Facebook Pixel for WordPress – you can get the download link or learn more about how to install it here.
That’s it. I hope you found this read helpful. You may also want to connect your Facebook business page and drive traffic to your WordPress site.