In case you did not know, WordPress is built with PHP, an open source programming language. When there are upgrades available for PHP, it is always recommended and expected to upgrade to the latest PHP version.
As an active programming language, PHP gets updated regularly for performance and security.
New PHP versions can increase website performance and speeds by up to 3x or 4x the older versions.
As the years go by, older versions get into what we call End of life, meaning that support and updates to these versions will no be provided.
As a popular programming language, and a popular content management system PHP and WordPress respectively are a target of hackers.
Though your website may continue running, there are high chances that it is exposed to security threats and vulnerabilities.
That is why you need to upgrade to the latest PHP version.
Before you upgrade to the latest PHP version, create a backup of your website.
Make a copy of your WordPress website, files, and database inclusive.
You want to restore fast in case things do not go as desired.
I highly recommend our WPVivid Backup Plugin – a Free WordPress Website Backup Plugin
If you do not have it already, then you can read our guide on how to install WPVivid, and how to back up your website with WPVivid, and in case you will need, how to transfer a WordPress website with WPVivid.
Step by Step: How to upgrade a WordPress site to the latest PHP version?
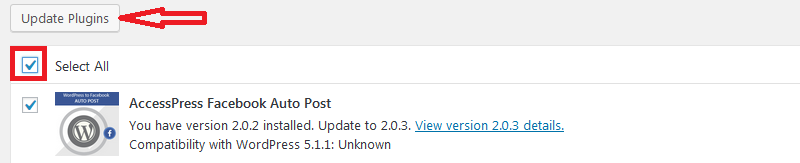
Update your files — themes, plugins, and WordPress core
As we prepare to move to the latest version, you need to upgrade the theme and plugins to the latest versions.
Click updates from the Menu.

Select all the plugins and themes and then click the update buttons under the respective items.
Check for PHP compatibility
After you have made a backup and have successfully updated WordPress, themes, and plugins, then you are ready to prepare your website for a PHP upgrade.
For that, we shall use PHP Compatibility Checker plugin to ensure that our themes and plugins are compatible with the newer PHP versions.
Go ahead to install and activate it. Once it is activated, head to Tools and then PHP Compatibility.

Select the PHP version and the status of which plugins and themes to test.
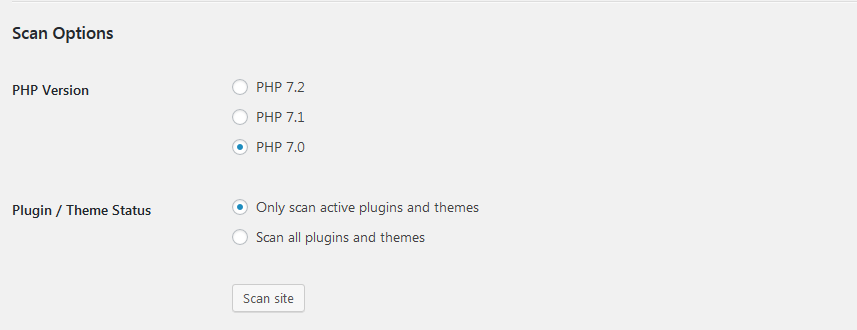
Depending on the number of plugins on your site, it may take several minutes to complete the compatibility checks.
When it is complete, you should see the results of the checks. Click the toggle details link to see details of the results and for plugins that returned errors, the details of the errors or warnings.

If you need to disable some plugins, then go ahead.
Upgrade PHP
From the compatibility check report, you can know what needs to be done with what plugins.
Next, we upgrade PHP to the latest version.
Login to your hosting control panel. In my case, I use cPanel.
Under SOFTWARE click MultiPHP Manager.

In the screen below, I will upgrade from PHP 5.6 to PHP 7.
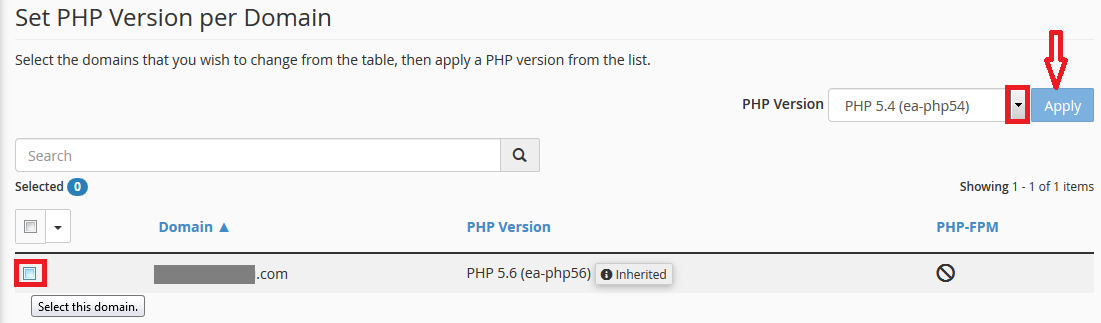
On the left of the domain name, select the domain name, then on the PHP version drop-down, select the latest PHP version and then click Apply.

A flash message is displayed notifying you of the successful upgrade of PHP.

NOTE: Some hosting companies disable this on client accounts.
In that case, you will need to contact your host to upgrade your PHP version for you.
Test the website to make sure that it is working
The final step is testing that the site is functioning well.
If it works fine as it should, then, successfully upgraded to the latest PHP version.
If not, check the errors that are given, then fix them, for plugin related errors, you could delete the plugin and look for a compatible one.
Or follow the steps above and choose the version that you know works for your website.
Just in case you need to, you can always restore your website to the last functioning state with WPVivid.
Conclusion
If you are running a sensitive site, then you may have to add one more step, create a staging environment to test your website before you upgrade to the latest PHP version.
A staging environment helps you run the same site in parallel, it in this environment you can test the website with any new features you want to add to the production website.
When issues arise; you fix them from there, when all is good, you can go ahead and upgrade to the latest PHP version and deploy the working code of any changes you made to the production website.
Backup your website with WPvivid, test that your website is compatible with the latest PHP version, upgrade your PHP and test your website that all is good.
That is how you upgrade to the latest PHP version. You may also want to learn how to stop WordPress auto updates.