If you work with a relatively large team, or you just have a knack for organization – tagging every stage of your workflow – then you should be interested and want to know how to create a custom post status in WordPress.
All content in WordPress is by default tagged with the published and draft only. These work, for most bloggers and website owners never think of any other status and would never imagine a need for anything more.
Work with a large and diversified team of content creators: writers and editors, and you will find value in a clear way of tagging with custom statuses your creation processes tracking progress across the whole team.
You want to know when a post is at the ideation stage, assigned to a writer, prewriting, research, drafting, revising, editing, and proofreading.
Ideally, you think of the stages in your writing process. Now assign a custom status to each one of these stages.
We shall enlist the help of a plugin to create custom post statuses in WordPress.
For this article, we will use, PublishPress
PublishPress helps you plan and publish content with WordPress. It features a content calendar, notification, and custom statuses – which we are interested in.
Step by Step: How to Create Custom Post Statuses in WordPress
Step1. Install and activate the plugin
Log in to your WordPress backend.
Go to Plugins >> Add New
Enter in the search box “PublishPress.”
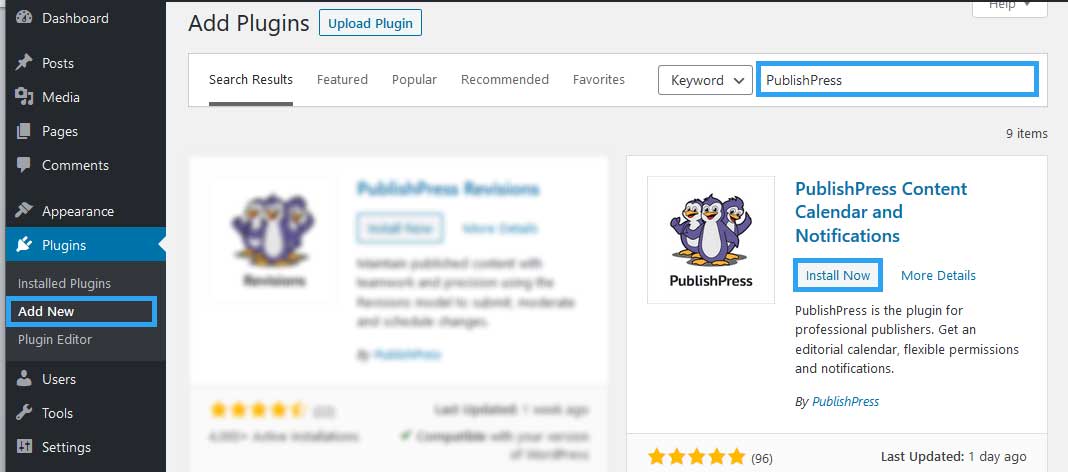
When the results load, you will see PublishPress Content Calendar and Notifications.
Under it, click Install Now.
After a second or two, click Activate to activate the plugin.
Step2. Create custom statuses
Once installed, go to the PublishPress Settings on your left menu.
From there, go to the Statuses tab.
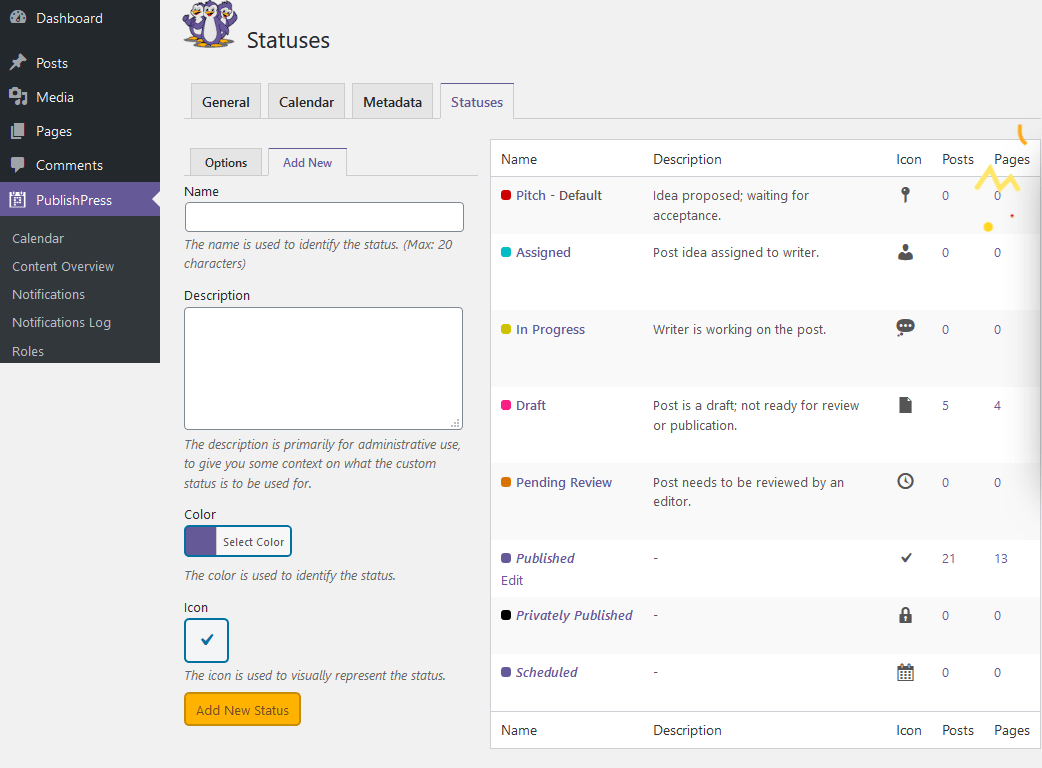
The plugin comes with some custom statuses already created. These include:
- Pitch– Idea proposed, waiting for acceptance.
- Assigned– Post idea assigned to a writer.
- In Progress– The writer is working on the post.
- Draft– Post is a draft, not ready for review or publication.
- Pending Review– Post needs to be reviewed by an editor.
- Published
- Privately Published
If you want more custom statuses than the ones that come with the plugin, then create your own.
Still, under the Statuses tab, click Add New.
Now provide your custom status a name and description.
If you wish, you can add a color and an icon to it.
When you’ve done that, click the Add New Status button at the bottom of the screen.
Step3. Add custom statuses to a page
On a new post or page, on the right pane under the Document tab, go to the Post Status and set your custom status.
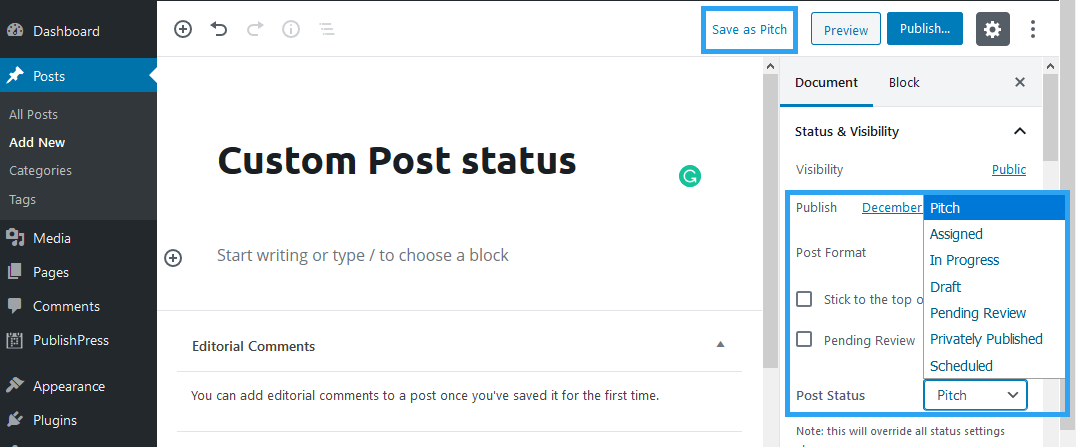
Once you select a custom status, you will see on the bar with the publish button on top of the page, a link with Save as “Custom Post Type.” You can see mine is Save as Pitch because I selected the Pitch content type.
Note that you can only set custom statuses on content that is not published.
The assumption is that published content is past the work-in-progress stages of content creation.
To, therefore, add a custom status to a post or page, you will need to unpublish the content first, and then edit it to select a custom status for it.
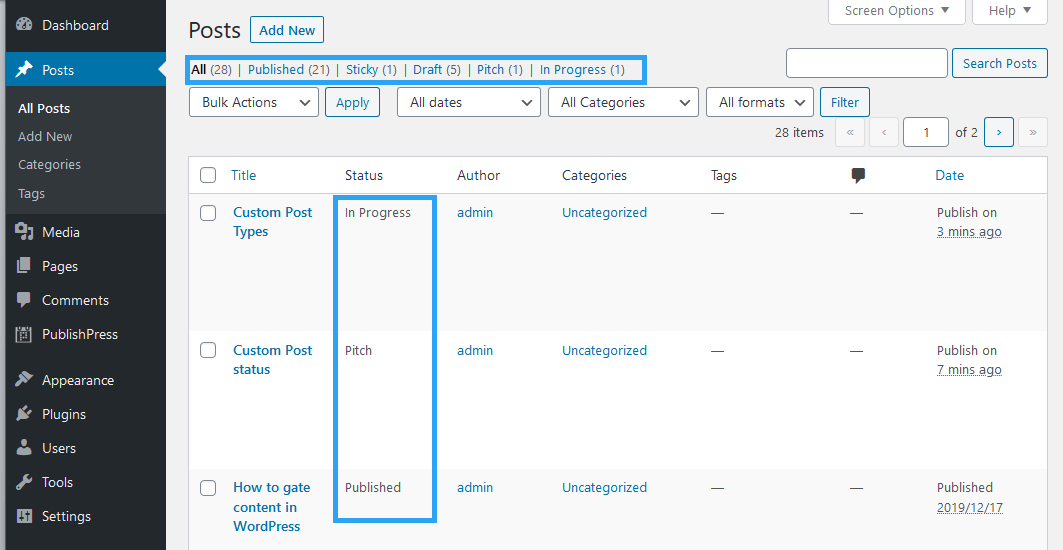
Your posts or pages page will now list all your content with all the statuses. You can manage your posts from there based on statuses as you would if you wanted to view or manage only posts that are drafts or published – the default statuses that come with WordPress.
Conclusion
I hope PublishPress works for you. Creating custom post statuses is easy and straightforward, and with it comes a bonus of a content calendar.
Talking of bonuses, another great plugin you can experiment is Edit Flow.
It has the custom statuses feature we are looking for to define the key stages of your workflow.
In addition to that, like PublishPress, it comes with a convenient content calendar and notifications.
It then goes beyond that to give your team a private threaded editorial comments feature for discussion between editors and writers.
It organizes these editors and writers – users – into user groups organized by function or department.
And a really nice feature for bigger publishes is the story budget. Wouldn’t it be nice to keep track of your content creation budget within WordPress?
That’s it! Hopefully you have found this read helpful. You may also want to learn how to display last updated date for your WordPress posts.