As website visitors, we obsessed with fast loading websites. As a website owner, you must build a website that loads fast. One way you can do that is by compressing the files, and that is why I will show you how to enable GZIP compression in WordPress, the easy way.
GZIP is a file compression and decompression utility, with which you can reduce the size of website files a browser has to download.
When a visitor makes is looking for information on your website, the browser sends a request to the server hosting of the website, the server retrieves the data requested, compresses it and sends it back to the browser which then decompresses it. By doing this, a single and smaller file is sent to the browser, tremendously improving on the load time.
It is not only your website visitors who are interested in sites that load fast. Search engines like Google place much weight on page speeds in their search ranking criteria.
Page speeds are so important to Google that they even have a tool in the same name to help website owners learn what affects the speeds of the websites, Google PageSpeed Insights.
I hope this article will help you improve the speed of your website, but first, you need to know –
How to check if GZIP is enabled on a WordPress website?
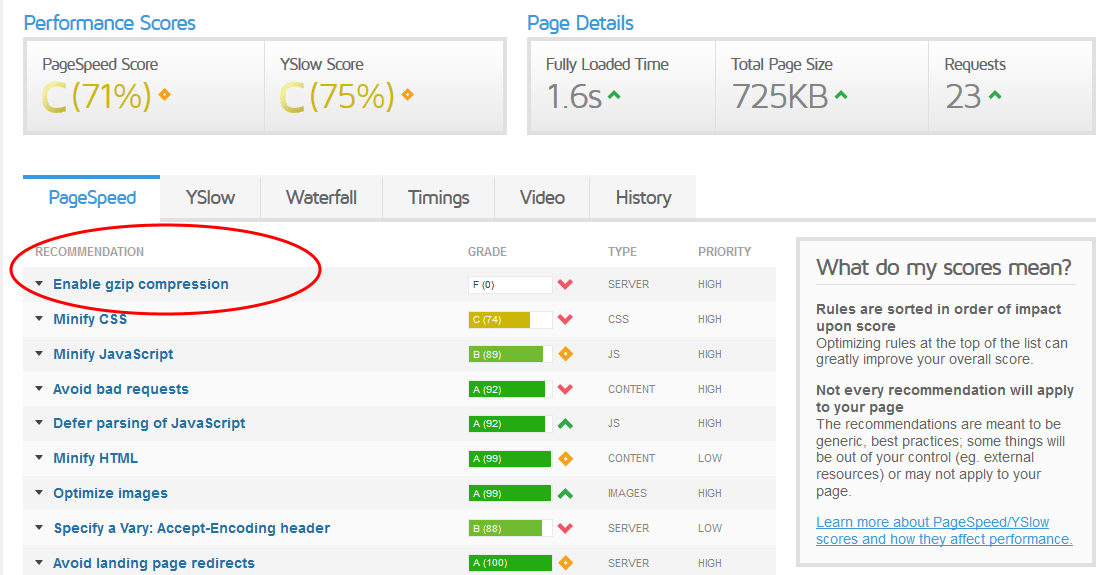
A free tool I love to use in any website performance optimization job is GTMetrix.
Compression is one of the several benchmarks they test on a webpage.
You can head to https://gtmetrix.com/ and test your website. The test results will tell you if you need or don’t need to enable GZIP compression.
If you want to be on top of the SERPs, if you wish to your website to load fast, then one thing you can do now is enable GZIP compression in WordPress.
Here is the easy way to go about it.
How to Enable GZIP compression in WordPress?
Enable GZIP compression in WordPress using a plugin
GZIP is a software utility that runs on a server.
Luckily, most web servers come with GZIP installed, but, for a website to make use of it, one needs to enable compression for her website manually.
Usually, this requires adding some code your configuration files – for instance on Apache servers you need to modify the .htaccess file. The easy way, though, is using a plugin.
Since we are talking of WordPress here, you are spoiled for choice for what plugin to use.
Here are some of the plugins I have worked with that you can explore.
- WP Super Cache
- W3 Total Cache
- and more in our top picks for the best free caching plugins for WordPress.
Enable GZIP compression in WordPress with Hummingbird
I have used most caching and performance plugins, but, one that consistently works is Hummingbird. The free version has more than enough features, including the ability to enable GZIP compression in WordPress.
Install Hummingbird.
The easiest way is through the Add Plugin area on your website. Click the Install Now button, after it installs Activate the plugin.
The first time you run the plugin or if there are any changes to your site, you will need to run the Performance test.
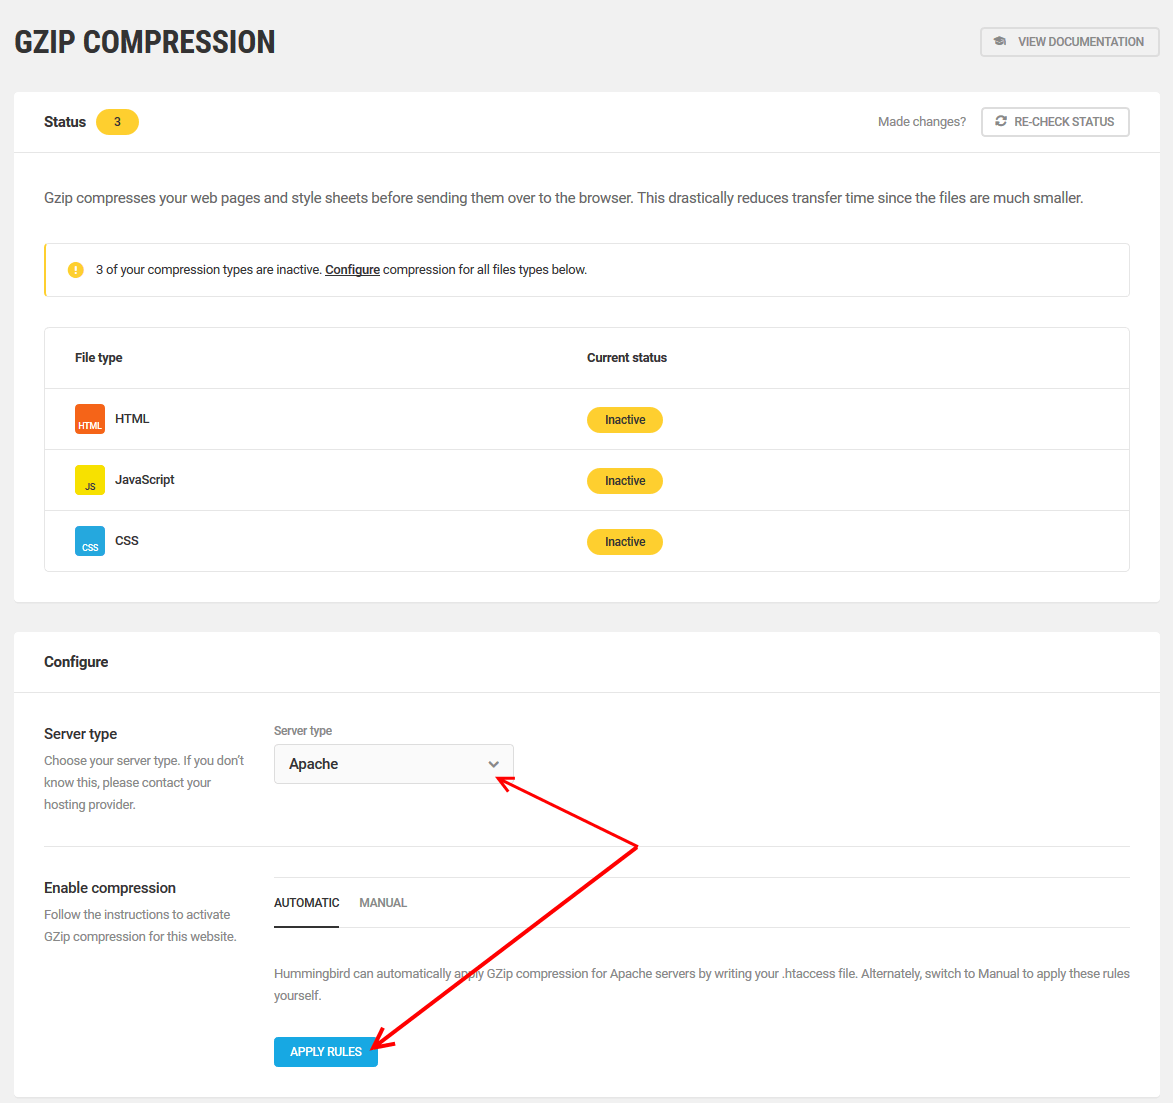
Enable Gzip Compression.
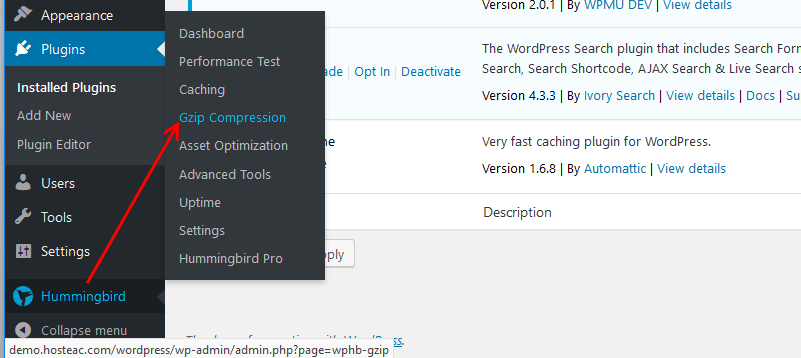
Once it is installed, on the left menu under Hummingbird, go to Gzip Compression.
On the GZIP compression page, you will see the file types that need compression.
I used the automatic compression setting. It automatically modifies the .htaccess file with the compression rules.
The Manual setting generates code that you need to paste to your .htaccess file. You can use this if the automatic setting is not working.
Scroll down and choose your server type, then click Apply rules.
Now go back to www.gtmetrix.com and retest your website.
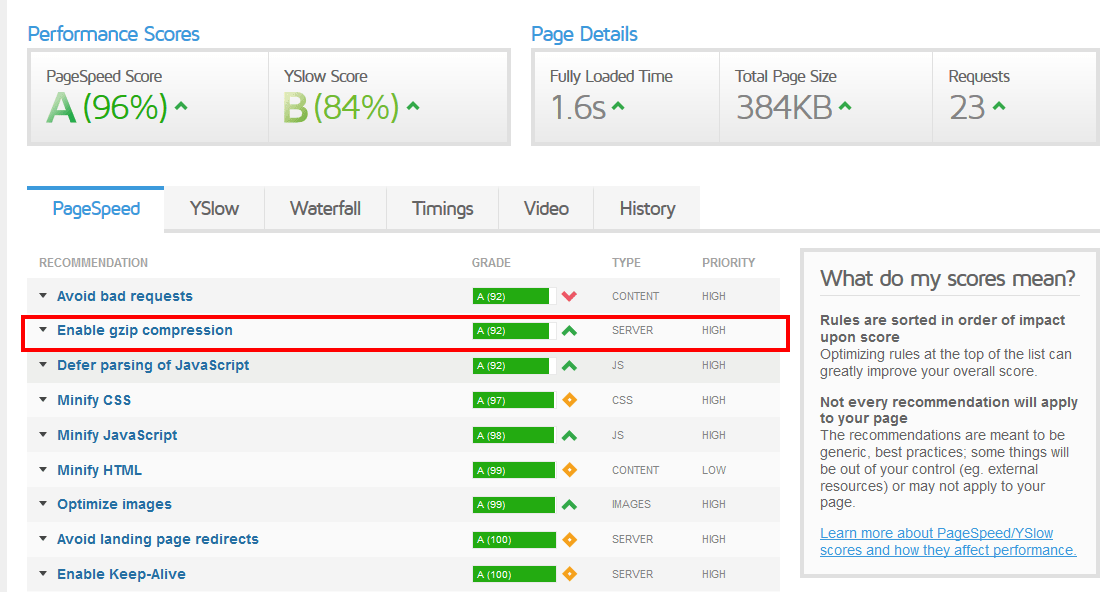
GZIP compression is now enabled. Do you notice the leap in the performance scores?
Just in case this plugin or any other fails to compress your files, then you will need to contact your host.
Conclusion
Enabling GZIP is as easy as installing a plugin.
There are several other technical methods for tech buffs, but, for a regular DIY website owner, using a plugin is the safest and fastest way to achieve the results you need. Hummingbird, for instance, modifies the .htaccess file automatically without you having to edit it manually.
I hope this guide helps. You may also want to learn how to setup CloudFlare CDN in WordPress to speed up your WordPress website.